


Request validation or server-side input validation in your web application is extremely important. Weak server-side input validation can allow attackers to exploit your application. In this article, I will walk you through what server-side validation is and how you can do it in Java.
What is server-side validation?
The internet is constantly building forms to collect user information. The definition of forms varies from application to application. For instance, on Instagram, when you upload a picture, you are filling in a form where the required fields are an image and a caption, when you are filling a form on Google, the required field is a text box that you need to fill in to search something. A more common example is buying a product on Amazon. You search for a product, select the product, enter shipping details, enter payment details, and then finally buy it. Usually, when you miss filling in some fields, you see an error message asking you to fill it in. This message that you see and the functionality where you are not allowed to proceed without filling in the required fields is client-side validation. We need this for a good user experience and to avoid the user from entering incorrect or incomplete information.
Next, this form is submitted and sent to the server-side usually using an API. Here, your API validates the request inputs again. Say when you check out on Amazon, their APIs validate if the address is filled in correctly, the card information is complete and valid, etc. This is called server-side validation. There are other terms for it as well like request validation, server-side input validation, etc. But they all refer to the same thing - validating the user request on the server side before processing it.
Now, that we know what server-side validation is, the next obvious question is why is it important enough to read an article about it from a random stranger on the internet. Fair enough. Let's look into that.
Why is server-side validation important?
Consider a 3 tier application that takes inputs about employ details from users to add them to a database. Take a look at the below diagram to visualize it better:
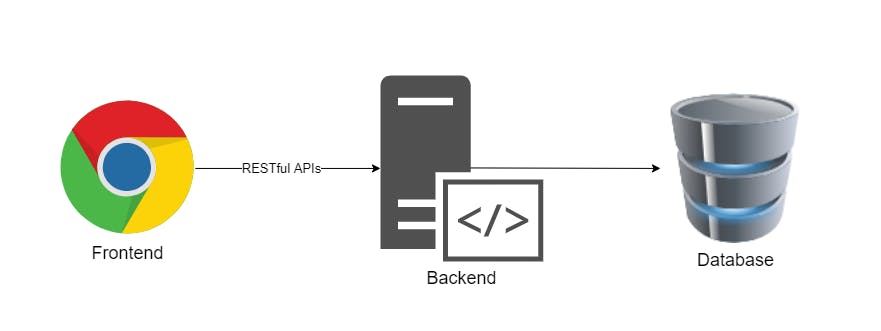
Here, the user inputs some employee details like the first name, last name, age, and department and submits the form. This form is then sent to the backend/server-side to store it in the database. All the fields are mandatory so if a user misses filling in some details, they will not be allowed to submit the form. This is all expected.
Now, if someone is trying to exploit your application, they will try and see if they can send a request to your REST API directly and send incomplete information to mess up the data in your database. This is where server-side validation is important. Before your backend processes the data sent in the request, it will validate if the information entered is valid for example, the required fields are not sent empty, the age is as expected i.e. if you have a rule to only allow a certain age group (for eg. 18-60), that rule is followed. If any of these rules are not followed, your API will respond with an error message and status (preferably HTTP 400 Bad Request).
It may seem like a pretty small problem when someone is sending invalid information to your application - it isn't. For some perspective, imagine you're building an application where you only allow anyone over the age of 18 to use it. An attacker figures out your application is missing server-side input validation and signs up as a 15-year-old and then sues you for allowing minors on your application. It can get worse than that when you start ignoring security in your application. 😇
Implementing server-side validation in Java
Now that we know what server-side validation is and why it is important, let's see how we can implement it. For the sake of this implementation, we will be building a service to add, update, and remove employees from the database using Springboot and Maven. For the validation, we will be using hibernate-validator which is an implementation of JSR380. JSR 380 is a specification of the Java API for Java bean validation. Note that we are not actually implementing the logic as that is beyond the scope of this article.
The validation implementation does not change even if you use any other framework. So you can re-use it, irrespective of the framework you are working with. 🙂
The dependencies
Below are the dependencies we need to add to our Springboot project's pom.xml:
   <dependency>
            <groupId>org.springframework.boot</groupId>
            <artifactId>spring-boot-starter-web</artifactId>
        </dependency>

        <!--Optional : used for getters, setters, etc.-->
        <dependency>
            <groupId>org.projectlombok</groupId>
            <artifactId>lombok</artifactId>
            <version>1.18.20</version>
            <scope>provided</scope>
        </dependency>

        <dependency>
            <groupId>org.springframework.boot</groupId>
            <artifactId>spring-boot-starter-validation</artifactId>
            <version>2.4.4</version>
        </dependency>


        <!--Dependencies for testing-->
        <dependency>
            <groupId>org.springframework.boot</groupId>
            <artifactId>spring-boot-starter-test</artifactId>
            <scope>test</scope>
        </dependency>
        <dependency>
            <groupId>junit</groupId>
            <artifactId>junit</artifactId>
            <scope>test</scope>
        </dependency>
        <dependency>
            <groupId>org.junit.jupiter</groupId>
            <artifactId>junit-jupiter-params</artifactId>
            <scope>test</scope>
        </dependency>
You will not see the hibernate-validator in the dependencies here as I have instead used spring-boot-starter-validation which consists of hibernate-validator as well as jakarta.el from Glassfish that contains an implementation of expression language and will allow us to use expressions in our validation messages. If you are not using Springboot, you can add the following dependencies instead:
   <dependency>
      <groupId>org.glassfish</groupId>
      <artifactId>jakarta.el</artifactId>
      <version>3.0.3</version>
      <scope>compile</scope>
    </dependency>

    <dependency>
      <groupId>org.hibernate.validator</groupId>
      <artifactId>hibernate-validator</artifactId>
      <version>6.1.7.Final</version>
      <scope>compile</scope>
    </dependency>
The implementation
Now, let's create a simple POJO called Employee.java as below:
@Data
@AllArgsConstructor
@NoArgsConstructor
@Builder
public class Employee {

    private String firstName;

    private String lastName;

    private LocalDate dateOfBirth;

    private String department;

}
Note that the annotations on the Employee class are coming from Lombok. There is nothing special about this POJO and it does not contain any validation yet. So, first, let's add the following validations to the POJO that we get out of the box from our dependencies:
@Data
@AllArgsConstructor
@NoArgsConstructor
@Builder
public class Employee {

    @NotBlank
    private String firstName;

    @NotBlank
    private String lastName;

    @Past
    private LocalDate dateOfBirth;

    @NotBlank
    private String department;

}
I've added a bunch of @NotBlank to the String fields. This will ensure that if the user sends a blank value for these Strings in the request, they will get an error message saying that they are not allowed to send a blank value. I've also added a @Past annotation for the date of birth since we know that the date of birth should always be from the past. If the user sends the current date or a date from the future for this input, they will get an error message saying that they are only allowed to send a date from the past for this field.
This does a whole lot but it still does not solve all our problems. For instance, the @Past is quite vague for our use case as one can send yesterday's date as the value for this field. I don't think we want to add a 1-day old employee to our organization. 😉
We need to add a more specific validation here for the date of birth. Let's assume that we want to ensure that we can only add employees between the age of 18 and 65. For this, we will be creating a custom validator that can accept a minimum and maximum age value. Let's call it @Age and here is what it looks like:
@Retention(RetentionPolicy.RUNTIME)
@Target({ElementType.METHOD, ElementType.FIELD, ElementType.ANNOTATION_TYPE, ElementType.CONSTRUCTOR, ElementType.PARAMETER, ElementType.TYPE_USE})

// Contains the logic for validation
@Constraint(validatedBy = AgeValidator.class)
public @interface Age {

    // The message users will see when they send an invalid value
    String message() default "Age must be between {min} and {max}";

   // Ignore this for now and we will come back to it
    Class<?>[] groups() default {};

   // Ignore this for now and we will come back to it
    Class<? extends Payload>[] payload() default {};

   // Input for min age
    long min();

   // Input for max age
    long max();
}
Now that we have the annotation defined, we need to add an implementation for it as well. You can see the comment in the @Age class above the @Constraint that points to AgeValidator.class as our implementation class. Let's build that class:
public class AgeValidator implements ConstraintValidator<Age, LocalDate> {

    private long minAge;
    private long maxAge;

    @Override
    public void initialize(Age age) {
        this.minAge = age.min();
        this.maxAge = age.max();
    }

    @Override
    public boolean isValid(LocalDate localDate, ConstraintValidatorContext constraintValidatorContext) {
        return Objects.nonNull(localDate) &&
                isGreaterThan(localDate) &&
                isLessThan(localDate);
    }

    private boolean isLessThan(LocalDate localDate) {
        return ChronoUnit.YEARS.between(localDate, LocalDate.now()) < maxAge;
    }

    private boolean isGreaterThan(LocalDate localDate) {
        return ChronoUnit.YEARS.between(localDate, LocalDate.now()) >= minAge;
    }
}
Here, as you can see, we are implementing ConstraintValidator and the logic for it sits in the isValid() method. The logic is straightforward. If the value sent in a request for that field is less than the minimum value defined or greater than the maximum value defined, isValid() will return a false and the user will get an error message.
Let's add this annotation to our POJO as below:
    @Age(min = 18L, max = 65L)
    private LocalDate dateOfBirth;
You can see we have replaced the @Past annotation as we no longer need that. The new custom validator we have created is more specific for our use case.
Great, that was easy, wasn't it? 😎
Now, let's take a look at the fields we had ignored earlier in our validator i.e. groups and Payload.
Imagine a scenario where one of the employees was moved to a different department and you are just updating their details. Here, you don't want the user to send the other details like their first name, last name, and date of birth. One of the things we can do here is to create a new POJO. But that's not ideal. So let's try to reuse this POJO. We want the validations on the first name, last name, and date of birth to be applied only in case when a new employee is added and not when an existing employee's details are updated. This is where we can use groups. Groups basically is a way to group a set of validations together. Meaning, we are grouping validation of the first name, last, name, and date of birth together, and we are leaving the department as a mandatory field for all requests. Thus, the validation on the fields that belong to a group will only be triggered when the group validation is explicitly called.
To do this, we first need to create a group. We can do that by creating an empty interface with the group name and extending javax.validation.groups.Default as below:
public interface AllEmployees extends Default {
}
Next, let's add this group to our validators as below:
   @NotBlank(groups = AllEmployees.class)
    private String firstName;

    @NotBlank(groups = AllEmployees.class)
    private String lastName;

    @Age(min = 18L, max = 65L, groups = AllEmployees.class)
    private LocalDate dateOfBirth;
Note that department is not added to this group. However, it will be validated anyway since we have extended our custom group to the Default group. This ensures that the fields that are not annotated with this custom group are also validated when validation is run.
Let's also create a service class where the implementation will sit. I just want to show you how groups are used and we are not going to add actual implementation in this service class. Let's call this class EmployeeService.java and will look like below:
@Service
@Validated
public class EmployeeService {

    @Validated(AllEmployees.class)
    public void addEmployee(@Valid Employee employee) {
        //do something

    }

    public void amendEmployee(@Valid Employee employee) {
        //do something
    }

}
Let me break down this class and the annotations in it for you. You will notice that the class is annotated with @Validated which is required to ensure that the group validation kicks in. Next, the addEmployee() method is annotated with @Validated(AllEmployees.class). This will ensure that when this method is called, the request will first be validated for all the validators grouped under AllEmployees i.e. the field in which we have added the AllEmployess.class as the group to the validator. Remember that department will be validated too since it belongs to the default group. The request is passed on to the method only when the validation is successful. The last but the most important annotation here - @Valid. We have annotated the method parameter (Employee POJO) with @Valid to ensure that it is validated. Without this, the validation will not be carried out.
On the other hand, the amendEmployee() method is not annotated with @Validated and any group. Thus, this method only needs department to pass validation. The other fields are added to a different custom group and this method does not validate for any custom group, but only the fields that belong to the default group, which in this case is department only.
Finally, let's take a look at Payload that I had added to the custom validator. I don't want to use this parameter as the article will get a bit overwhelming if I add that example as well, so I will just explain it. However, if you want me to give you a working example as well, leave a comment and I will update the article with it. 🙂
Payload is used to pass some metadata to the validator. Imagine you want to pass some information like if the first name fails validation, raise a SEVERE error. We can do that by passing this information as the Payload to validation annotation.
The test
Let's test the validation we have just added. We first need to create a test class with all that we need and then we can start adding tests to it. Let's call this test EmployeeValidationTest.class and add the following to it:
@SpringBootTest
public class EmployeeValidationTest {


    protected static Validator validator;

    private static ValidatorFactory validatorFactory;

    @BeforeAll
    static void setUp() {
        validatorFactory = Validation.buildDefaultValidatorFactory();
        validator = validatorFactory.getValidator();
    }

    @AfterAll
    static void tearDown() {
        validatorFactory.close();
    }

}
Here, we will be using validator to validate the input. The validator can accept the request as well as a group. Another thing to note is that I will be using @ParameterizedTest. This will allow us to pass arguments from a different method to this test. You can read more about it here. First, let's test that the validation for our custom group works as expected. To do this, we will pass a bunch of invalid requests and expect an associated error message to be returned for each one of them. Below is the test and the arguments we are passing to the test:
@ParameterizedTest
    @MethodSource("invalidTestData_addEmployee")
    @DisplayName("Add employee - Should fail validation")
    void addEmployee_shouldFailValidation(Employee employee, String invalidProperty, String message) {
        Set<ConstraintViolation<Employee>> constraintViolations = validator.validate(employee, AllEmployees.class);
        assertThat(constraintViolations).anyMatch(violation -> violation.getPropertyPath().toString().equals(invalidProperty) && violation.getMessage().equals(message));

    }


    private static Stream<Arguments> invalidTestData_addEmployee() {
        return Stream.of(
                //Pass first name, last name, and department as blank strings:
                Arguments.of(Employee.builder()
                        .firstName(" ")
                        .lastName("Doe")
                        .dateOfBirth(LocalDate.now().minusYears(20))
                        .department("Engineering")
                        .build(), "firstName", "must not be blank"),
                Arguments.of(Employee.builder()
                        .firstName("John")
                        .lastName(" ")
                        .dateOfBirth(LocalDate.now().minusYears(20))
                        .department("Engineering")
                        .build(), "lastName", "must not be blank"),
                Arguments.of(Employee.builder()
                        .firstName("John")
                        .lastName("Doe")
                        .dateOfBirth(LocalDate.now().minusYears(20))
                        .department(" ")
                        .build(), "department", "must not be blank"),

                //Pass first name, last name, and department as null:
                Arguments.of(Employee.builder()
                        .lastName("Doe")
                        .dateOfBirth(LocalDate.now().minusYears(20))
                        .department("Engineering")
                        .build(), "firstName", "must not be blank"),
                Arguments.of(Employee.builder()
                        .firstName("John")
                        .dateOfBirth(LocalDate.now().minusYears(20))
                        .department("Engineering")
                        .build(), "lastName", "must not be blank"),
                Arguments.of(Employee.builder()
                        .firstName("John")
                        .lastName("Doe")
                        .dateOfBirth(LocalDate.now().minusYears(20))
                        .build(), "department", "must not be blank"),

                //Pass invalid date of birth
                Arguments.of(Employee.builder()
                        .firstName("John")
                        .lastName("Doe")
                        .dateOfBirth(LocalDate.now().minusYears(17))
                        .department("Engineering")
                        .build(), "dateOfBirth", "Age must be between 18 and 65"),
                Arguments.of(Employee.builder()
                        .firstName("John")
                        .lastName("Doe")
                        .dateOfBirth(LocalDate.now().minusYears(66))
                        .department("Engineering")
                        .build(), "dateOfBirth", "Age must be between 18 and 65"),
                Arguments.of(Employee.builder()
                        .firstName("John")
                        .lastName("Doe")
                        .department("Engineering")
                        .build(), "dateOfBirth", "Age must be between 18 and 65")

        );
    }
Now, let's also add a simple positive test case to ensure that the validation passes when the inputs are correct:
    @Test
    @DisplayName("Add employee - Should pass validation")
    void addEmployee_shouldPassValidation() {
        Employee employee = Employee.builder()
                .firstName("John")
                .lastName("Doe")
                .dateOfBirth(LocalDate.now().minusYears(20))
                .department("Engineering")
                .build();
        Set<ConstraintViolation<Employee>> constraintViolations = validator.validate(employee, AllEmployees.class);
        assertThat(constraintViolations).isEmpty();

    }
Let's test the other use case now i.e. when we expect only department to have a valid value while the others can contain null or invalid values.
    @ParameterizedTest
    @MethodSource("validTestData_amendEmployee")
    @DisplayName("Amend employee - should pass validation")
    void amendEmployee_shouldPassValidation(Employee employee) {

        Set<ConstraintViolation<Employee>> constraintViolations = validator.validate(employee);
        assertThat(constraintViolations).isEmpty();

    }

    private static Stream<Arguments> validTestData_amendEmployee() {
        return Stream.of(
                Arguments.of(Employee.builder()
                        .department("Engineering")
                        .build()),
                Arguments.of(Employee.builder()
                        .department("Engineering")
                        .dateOfBirth(LocalDate.now().minusYears(15))
                        .build()),
                Arguments.of(Employee.builder()
                        .firstName("       ")
                        .department("Engineering")
                        .build()),
                Arguments.of(Employee.builder()
                        .lastName("       ")
                        .department("Engineering")
                        .dateOfBirth(LocalDate.now().minusYears(15))
                        .build()),
                Arguments.of(Employee.builder()
                        .firstName("       ")
                        .lastName("        ")
                        .department("Engineering")
                        .build())
        );
    }
And finally, let's also test that when the value for department is invalid, the validation fails:
 @ParameterizedTest
    @MethodSource("invalidTestData_amendEmployee")
    @DisplayName("Amend employee - should fail validation")
    void amendEmployee_shouldFailValidation(Employee employee, String invalidProperty, String message) {
        Set<ConstraintViolation<Employee>> constraintViolations = validator.validate(employee);
        assertThat(constraintViolations).anyMatch(violation -> violation.getPropertyPath().toString().equals(invalidProperty) && violation.getMessage().equals(message));
    }


    private static Stream<Arguments> invalidTestData_amendEmployee() {
        return Stream.of(Arguments.of(Employee.builder()
                        .firstName("John")
                        .lastName("Doe")
                        .dateOfBirth(LocalDate.now().minusYears(20))
                        .build(), "department", "must not be blank"),
                Arguments.of(Employee.builder()
                        .firstName("John")
                        .lastName("Doe")
                        .dateOfBirth(LocalDate.now().minusYears(20))
                        .department("               ")
                        .build(), "department", "must not be blank"));
    }
And that's it! You have learned how to add server-side input validation in Java and protect your applications from attackers 😎
You can find the source code used in this article in my Github repo. If there's anything I can answer for you, please feel free to leave a comment here or reach out to me on Twitter. 🙌